


Longer Nano Duo
Engrave Like a Master
About Us
With Longer, Make It better


How printing temperature calibration on FDM printers
The printing temperature is a fundamental aspect if you want to achieve quality results. In fact, each type of filament requires a different printing temperature; for example, PLA requires temperatures between 190°C and 230°C, PETG requires temperatures between 220°C and 250°C, ABS requires temperatures between 230°C and 270°C, and so on.
Therefore, each type of material has a large extrusion temperature range, and to achieve the best results it is necessary to find the exact temperature for the particular material in use. In addition, the exact printing temperature for a certain PLA filament is not necessarily the same as for another PLA filament of a different brand or color; therefore, it is a good idea to calculate the printing temperature for each individual filament reel.
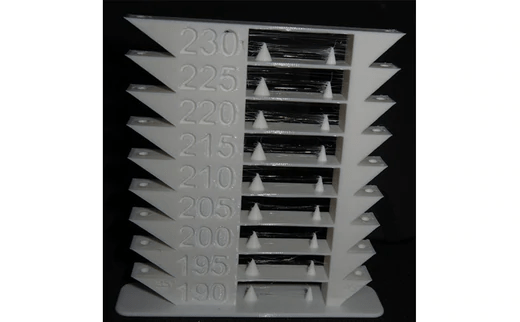
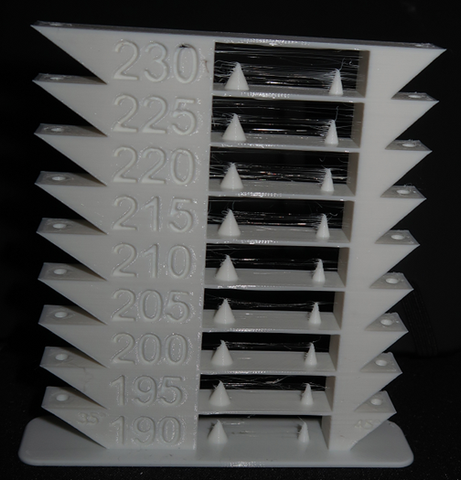
In order to get the exact printing temperature for your filament you can use a Temp-Tower. A Temp-Tower is the printing of a tower, printed at different temperatures as its height increases; in this way, different heights correspond to different temperatures, thus being able to obtain the correct printing temperature by observing what is the best level of the tower.
It is often possible to find ready gcodes of a Temp-Tower but it is strongly discouraged to use them, as a gcode made for an FDM printer different from your own, or with settings different from those normally used, cannot provide suitable results for your printer. For these reasons, it is a good idea to always create your own Temp-Tower gcode suitable for your printer and using your slicing settings, so as to obtain fully compatible results.
Creating a Temp-Tower is really easy:
1) Download the Temp-Tower stl file here:
Tower-Tower for PLA: https://www.thingiverse.com/thing:5159495
Tower-Tower for PETG: https://www.thingiverse.com/thing:5159499
2) Open the Temp-Tower file (in example, for PLA) in Cura
3) In Cura open the section Extensions – Post Processing – Modify G-Code
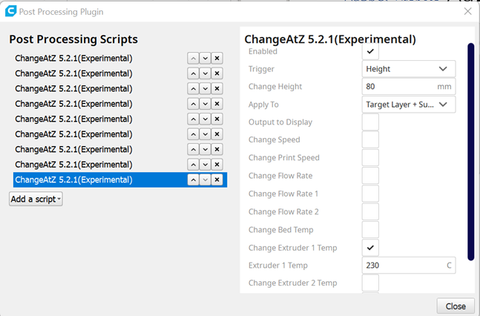
4) In the Post Processing Scripts menu click on Add a script and select the ChangeAtZ plugin
5) Configure the plugin as shown in the following figure:
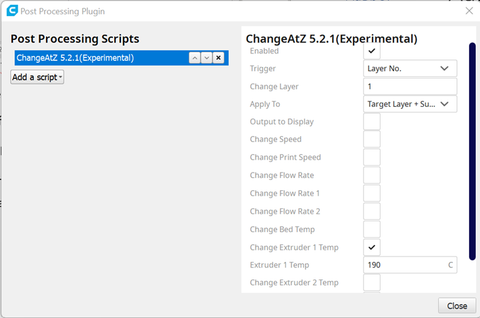
This script sets a temperature of 190°C at the starting layer.
6) Since the temperature must vary as the height changes, it is necessary to set other scripts; in particular, for the attached Temp-Tower it is necessary to increase the printing temperature of +5°C to heights of 10 mm, 20 mm, 30 mm, 40 mm, and so on up to 230°C.
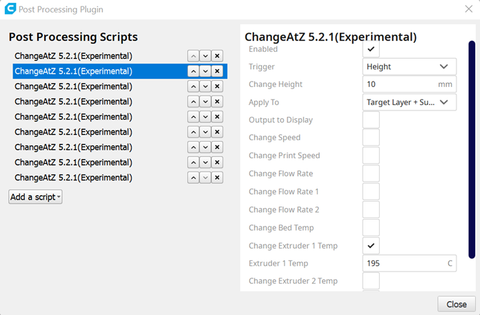

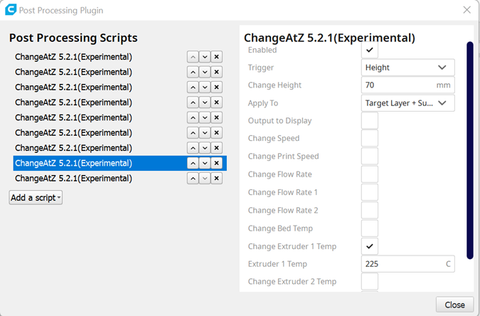
7) In this way, the temperature will vary with the height and each segment of the Temp-Tower will be made with a different printing temperature.
When the print is finished, observing the Temp-Tower you can determine the printed section with the best quality; this will provide the correct printing temperature for the filament used.
Hope this article help you while you testing FDM printers. If you interested in LONGER 3D printers, please check LONGER 3D discount page, buy best price of 3D printers and relate products online.
Original article: https://www.longer3d.com/blogs/academy/how-printing-temperature-calibration-on-fdm-printers
https://www.longer3d.com/products/lk5-pro-fdm-3d-printer
- Choosing a selection results in a full page refresh.
Products
Support
Policy
Follow Us
Contact Us
!