


Longer Nano Pro
The world's first 12W portable laser engraver


Christmas Sale
Celebrate this Christmas with LONGER
About Us
With Longer, Make It better


Item’s positioning on the printing bed
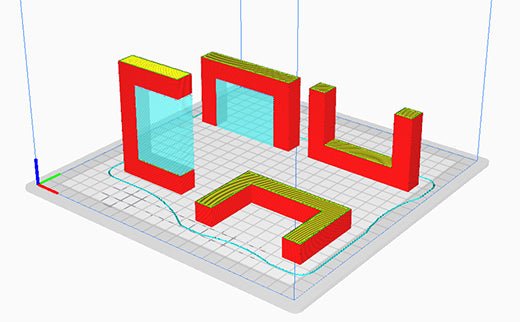
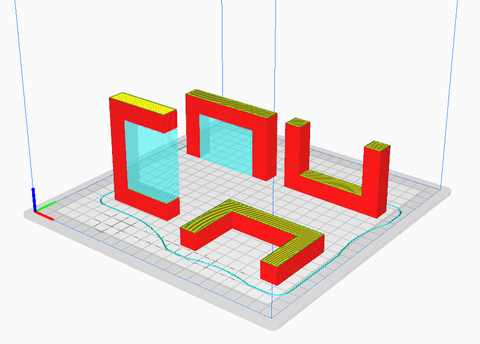
In FDM 3D Printing, during the slicing phase of the project to be printed you can completely choose how to place it on the print bed. In fact, each piece, depending on its geometry, can have one or more positions suitable for printing. The most trivial example is a full cube: whatever its side is placed on the print bed, the result does not change. Instead, the rectangle printing changes depending on the side placed on the plane, since depending on which side is placed on the plane, the printing of the rectangle can be developed in height or in length.
Another good reason to choose the correct position on the print bed is the possibility of avoiding the use of supports. In fact, for some projects it is possible to avoid cantilevered parts simply by changing the printing orientation: the final piece will be as desired, but its realization will have been much easier and faster.
However, often choosing a position without requires supports is not enough, and sometimes it is also a bad choice. In fact, depending on how the piece is printed, it takes on a different breaking point and a different load capacity. The example shown there are two positions that do not provide supports, but only one is the best one due to the geometry of the object.
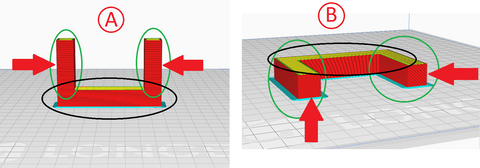
In case A, the parts highlighted in green are connected to the part highlighted in black only by a single layer; therefore, by applying an orthogonal force to the parts highlighted in green, they will be easily subject to breakage.
In case B, the parts highlighted in green are connected to the part highlighted in black through many layers; therefore, wherever an orthogonal force is applied, each part will be endowed with increased strength.
Sometimes it is more convenient to choose a location that requires supports rather than a position that does not need supports. An object like the one shown in this example focuses all effort on the part highlighted in blue, so the print between the part highlighted in blue and the part highlighted in yellow must be as strong as possible.
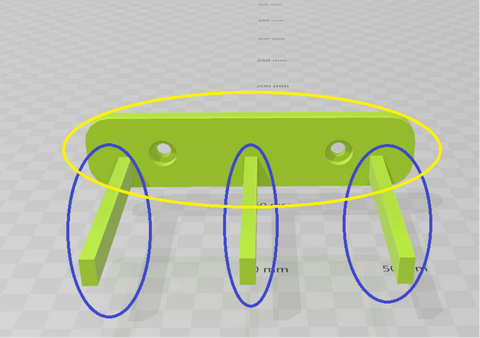
During placement on the print bed, these two positions are usually chosen, where the first does not need supports while the second needs supports.
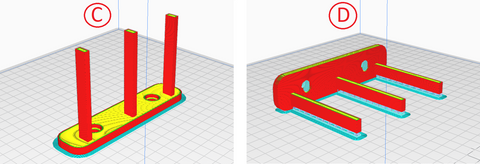
In case C, the parts highlighted in blue are connected to the part highlighted in yellow only by a single layer; therefore, by applying an orthogonal force to the parts highlighted in blue, they will be easily subject to breakage.
In case D, the parts highlighted in blue are connected to the part highlighted in yellow by many layers; therefore, by applying an orthogonal force to the parts highlighted in blue, each part will be endowed with greater strength. This is a case that shows that despite the presence of supports, printing will be mechanically better.
There are numerous cases where the absence of supports is an advantageous aspect, while in other cases it is absolutely necessary to carefully evaluate how to obtain a strong and durable piece regardless of whether or not you need supports. Each piece will assume a different printing configuration depending on its geometry, so it is always advisable to carefully evaluate the placement of the project on the print bed before starting a slicing, imagining the object in the context in which it will be used.
https://www.longer3d.com/products/lk5-pro-fdm-3d-printer
- Choosing a selection results in a full page refresh.
Products
Support
Policy
Follow Us
Contact Us
!