


Longer Nano Duo
Engrave Like a Master
About Us
With Longer, Make It better


Transform a 2D image into a 3D model

In 3D printing, the models with which you work are always three-dimensional, in .stl, .3mf or other. However, not everyone knows that image files and photos can also be processed in 3D.
In fact, using tools integrated in Windows it is possible to easily transform and process a 2D image into a 3D model, thus being able to proceed with the 3D printing of the photo. Note that this procedure is only compatible with .jpg, .png and vectorial images, with transparent background (so in case of background, this must first be removed using photo editing).

After choosing a 2D image without background (like this one above in the figure), open the "3D Builder" software preinstalled in Windows 10 (if it was not present, download it from the Windows Store). Then select "Open – Load image" to import the selected image.
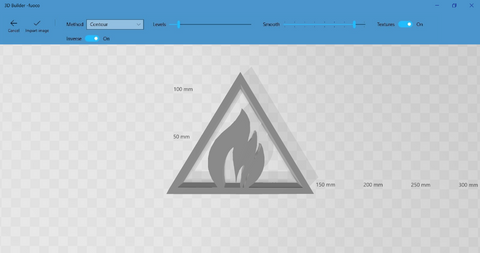
Once the image has been imported into 3D Builder, you can change some settings such as Levels, Smooth, and so on; using these settings, edit the file according to your preferences. Once the editing is complete, select Import Image to get the image converted to 3D file.
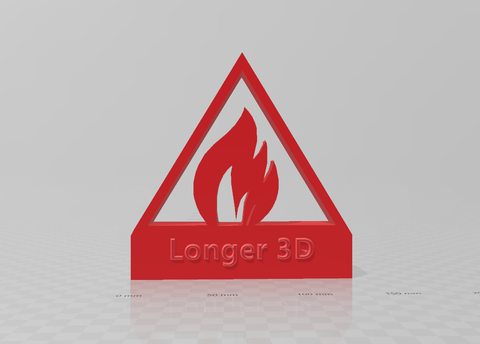
At this point you can keep the 3D file as it is and proceed directly to export the file, or alternatively you can edit it as you want; for example, the test file was modified by adding a base (with a downward extrusion) and writing on the base the "Longer 3D" logo, for last colored in red, as shown in the figure.
When the 3D model is ready, proceed to export, selecting "Save as - .3mf (or) .stl". The 3D model will be saved, and then you can open it in your slicer to create a .gcode to print.
By following this guide, you can transform almost any 2D image into 3D, as long as the background is transparent and does not create interference during the transformation; for best results you can use 2D files of .png type or .svg vectorial.
https://www.longer3d.com/collections/3d-printers-1
- Choosing a selection results in a full page refresh.
Products
Support
Policy
Follow Us
Contact Us
!